Thursday, January 27, 2022

Annual Regency Ensemble Project: Short Stays

 Regency Short Stays 

The first addition to my 2022 Regency Ensemble Project is the short stays. These were worn by women to encourage and accentuate the much-desired, columnar figure. There are many wonderful posts done by others on the origin of the short stays, as well as the different variations of them. 

Drafting the Pattern

I know I said I was going to use the Redthreaded short stays pattern, but in the end, I decided on drafting my own from instructions instead. (This was mostly because I was bored over Christmas and couldn't bring myself to wait for the pattern to be shipped). I used the same pattern drafting instructions I used to make my first pair of stays (and first Regency project ever). 

I've found over both times using them that the pattern instructions I used are very helpful for the foundation of the pattern, but, at least in my experience, need to be tweaked quite a bit to make the finished result. Now, when using pattern instructions provided by someone else, constructed with their specific measurements, this is to be expected to some extent. I would just advise having a very clear idea of what you would like your stays to look like and making adjustments from there. Overall, however, I cannot say I would have been able to draft the stays without the instructions and do recommend them if you plan on attempting your own. 

The Tweaks

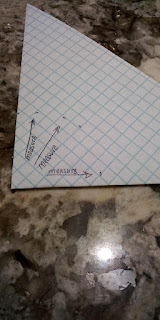
I changed the original pattern to be a few (2) inches longer than the original pattern suggested, lengthening the gussets to coincide with the new measurements. Additionally, I adjusted the armscye to be a bit wider. I found fairly consistently that my measurements caused my pattern to have a slight difference in shape, creating inconsistencies when it was time to draft the gussets. I worked around this by guesstimating ratios and reapplying them with my own measurements. Looking back, I wish I had done more mock-ups and fittings to make sure the gussets were the right size, as they turned out a tad big on top. I also removed the protruding tabs the original pattern had called for to connect the front part of the strap to the back part of the strap. I did this to avoid binding more curves.

Construction

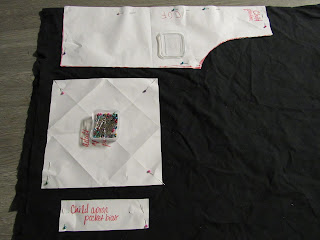
After some mock-ups, I began the stays by cutting the pattern pieces from two layers of a simple white cotton, and one layer of unbleached cotton drill. I considered using canvas for this layer (for extra strength), but after hearing the story of my grandma attempting to sew a sailboat sail (it did not end well), I decided against it. 

The gussets (cue traumatic memories) should have been easy considering it was my third time. This assumption, however, proved untrue. I sewed twelve gussets in total, completing each layer of fabric individually so I could baste them together later on. If you or someone you know is struggling with gusset failure, or feelings of inadequate gussets, know that yes, that last bit of frayed edge at the bottom center will definitely always be there. My solution to this, as well as any other problems that might arise, was stitching over it. I added reinforcement stitches to the problem areas. I will insert a link here to a good gusset tutorial. 


Note: one thing I struggled a lot with was getting the stitching as close to the edge of the gusset as possible, which resulted in a lot of seam-ripping and needle-holes from where the thread had been. To remedy this, I discovered lightly scrubbing the area with water and leaving it to dry. This removes the majority, if not all, of the perforations. 


After completing all three layers of the stays, I basted them together by hand. This made them easier to bind. I then inserted my plastic boning (true historical accuracy in this case was illegal) and connected the back straps to the back pieces with flat felled seams. 

Once I had done this, it was time to hand stitch the bias binding. I chose to go forego the machine for this particular step because I wanted it to look as clean as possible. My only regret with the binding was not being more careful on the curves and mitered corners, as they turned out a bit bunched. I was originally going to use a ready-made bias binding, however, like almost all good things, it contained polyester. I purchased a yard of white cotton and made my own. (I later discovered that the thread I was using also contained polyester, but we are going to pretend, for the purposes of my continued sanity, that this was not the case) (apparently, I decided to overlook machine stitching). 

After the binding was added, I handstitched the eyelets. Because the back straps are not connected to the front of the stays, there ended up being sixteen. A good eyelet sewing tutorial can be found here. I used two strings of embroidery floss. 

The End Result 

I like the 2022 version of my short stays the best. Lack of a thimble did result in some bloodstains (I'll have to find a tutorial for removing those, as well) but they are small. 


                                     The boning didn't want to lay flat.


Thursday, December 30, 2021

Adult & Child Apron Tutorial + Free Pattern

 An Easy Project 

Aprons are a great sewing project to make around the holidays. Not only can they be made in festive fabrics and pairs to match with family and friends, but they are also extremely easy and don't take much time to sew. 

Around the beginning of December, I started sewing aprons I made from this pattern to sell for a hospital fundraiser. Compared to other crafts I have had to mass produce, they proved both comparatively affordable and straightforward. I have attached a free printable pattern at the end of the tutorial so you can make them too. There is an adult size and a child size. 

Cutting the Fabric 

For this pattern you will need one fashion/decorative fabric and one lining fabric, preferably both cottons. As mentioned on the pattern, you will need to cut the main pattern pieces on the fold. This will help keep everything symmetrical and prevent you from having to sew multiple seams. 


  To make my pattern pieces, I just taped computer paper together and cut out my desired shape. Computer paper is useful for pattern making, as it is stiff and not as prone to wrinkling and warping as, say, a tissue paper, and is more commonplace than drafting paper. Here I have pinned the main pattern piece to my fabric, as well as the adult pocket binding and the children's pocket. I am making both a children's and adult size. 


For the main pattern pieces, you are going to want to add seam allowance of approximately 1/2 inch. Do not add seam allowance to the pocket and pocket binding pieces. 


Once you have cut out all the pattern pieces, match the main pattern pieces right-sides to right-sides and sew the bottom edge. It should look like this:


Next, put what you just sewed aside and sew the right side of the pocket binding to the right side of the pocket piece. 


Once this is done, flip the binding to the wrong side of the pocket piece like you would a bias tape and sew. This will create a decorative edge to hide the raw top of the pocket. This is how it will look:


Next, find the center fold line of both your pocket piece and main decorative piece, aligning them so when the pocket is secured, it will also be centered on the apron. Place the pocket where you would like it to go (preferably toward the center of the apron) and pin. Fold about a half inch up into the pocket on the bottom edge and pin as well. Now, this is where you could either sew to secure the bottom edge of the pocket to the apron or, if you don't like the look of stitching here, flip the pocket down towards the bottom of the apron so it can be easily sewn from the inside. Here is a picture to illustrate:


This way, when you flip the pocket back up after being sewn, it will be secured right smack back in the center, but without a line of stitching on the bottom. This is the method I chose, though in hindsight I realize it might have been easier and more aesthetically pleasing to do it the other way. Anyway, the next step is to flip in the side edges of the pocket and sew so that the pocket is secure on all three edges. 

                                                  Finished pocket  

Another thing that I did for the sake of clear illustrations was use a contrasting thread. I would not recommend this if you aren't fond of seeing the stitching itself, however, I quite like the way mine turned out. I think it accents the white in my fabric nicely. 

After you have sewn the pocket onto the apron, match the main pieces right-sides to right-sides again and sew up both side edges. You may wonder how in the heck we are going to attach the ties if we are sewing through the exact place they will be inserted. To that I say, trust the process. 


Turn the apron inside out or, rather, outsides out and go cut out your ties if you haven't already. To make the ties you are going to need one sewing machine, one chopstick, and a partridge in a pear tree. 

fold the tie piece in half and sew it closed close to the edge. Next, take your chopstick and turn it inside out so you can't see the stitching. You can find a good explanation of how to do this here. There are special tools you can buy specifically to do this, but I find a chopstick works just as well if you donate all your brain cells to the task of not losing your mind. 


Here is a photo of me doing that that provides no help whatsoever. 

Once you have turned all four fabric tubes right sides out, seam rip a small hole in each apron side seam that is level with the top of the pocket. Insert about a half inch of the tube into this space and pin. Topstitch both side seams from top to bottom to secure the waist ties. Complete the same process for the neck ties, except fold the top raw edges in before you insert the ties. Make sure you place them about 1 and 1/2 to 2 inches away from each side edge of the apron. This will allow it to fit better, as the neck ties will be closer to the neck. 

Finish the apron ties by turning in the raw edges at the end of each tie, topstitching them closed and ironing (optional) so they lay flat. After that, you should be done! Make sure all your strings have been clipped so you don't end up like me in the fifth grade. A very nice girl had to pluck them off my back for me. Enjoy your new apron by baking something festive! 

                                                  Gladys stylin'


Free Patterns- Not Drawn to Scale 

                       Child and adult patterns in my beautiful handwriting 

                                      A close up of the child pattern 

                                       A close up of the adult pattern 

For the adult ties: cut out 4 rectangles 2 inches wide and twenty-two inches long. 
For the child ties: cut out 4 rectangles 2 inches wide and eighteen inches long. 

Make sure to comment below if you try this tutorial!!!


Sunday, December 26, 2021

My First Attempt Series #1

 Meet Gladys 

I am starting a new series called "My First Attempt", which is basically going to be a portfolio of sorts; a catalogue of everything I've made pertaining to the Regency era so far. This is the first Regency dress I ever made. I was eleven at the time. It is worn by my lovely model, Gladys. Yes, I named my dress form. 


The main fabric is beautiful tea-dyed cotton I got from Candle on a Hill. You can find it at this link, here. The royal blue silk is from an old kimono my great-grandma got in Japan. I used the Reconstructing History pattern, choosing to opt out of long sleeves for the simple reason that I was unwilling to sweat to death. The first place I wore it was the 2018 Jane Austen festival. 


Here, I am posing for the camera on my mom's phone. The brooch is an heirloom from a great-great-grandma that I pinned to a fichu I made from an old curtain. The fichu and shawl were made from the same material. I will make another post in the future all about the hat, but essentially it is a poke bonnet I made from a deconstructed and heavily embellished straw hat from Michael's and some extra curtain fabric. 


 The neckline of the dress appears wider on Gladys because we are different sizes. I ended up making the dress a few sizes up for two reasons. The first was that the pattern I used didn't offer anything below a size six and my eleven-year-old self was barely out of the kid's section. The second was the sheer amount of layering that I had to account for. On top of the chemise, stays, and petticoat it was worn over, it ended up fitting quite nicely. 


As you can probably tell, or at least surmise, the dress is bib-front/drop-front. The blue Dorset buttons are purely decorative and were found at this seller on Etsy. I held the front of the dress up using small pins and drew the waist in using the silk sash. 

One thing I had never done was cartridge pleats. At first, I wasn't sure how I was going to make the back panel small enough to be sewn onto the bodice. I think the pattern called for box pleats, but it soon became apparent that the enormous amount of fabric I was working with could not be shortened by using a few pleats. I tried gathering, and then I tried more pleats than was recommended. Neither worked, so I did some research and found cartridge pleats. As it happens, these were accurate as they were used on dresses of the Regency era. Cartridge pleats are perfect for condensing a large amount of fabric into a shorter length without producing as much bulk as you might expect. 


The second place I wore it was the Jane Austen Centre in Bath, when I went with my family that same year. 

                                  My grandma made the spencer jacket

Here I am in all my mustachioed glory. We hoped to arrive in time for the annual promenade, but unfortunately, we were a few days late, so I settled for struggling down the street in my newspaper stuffed shoes and posing for pictures with people who mistook me for part of the exhibits. It was a lot of fun, and I got to see letters written by Jane Auten herself!!!! I accumulated a lot of dirt on the hem, but it touched the ground in Bath so what can I do but never wash it ever again XD.

                                    Me gazing lovingly at the camera

                                      Me gazing lovingly at the future

                                    Me gazing lovingly at a feather


All in all, this dress was really fun to make and even more so to wear. As you can imagine, I was very proud when I stitched that last stitch and presented it excitedly to every single person I saw over the next year and a half. 

Comment below if you've ever been to the Bath promenade!!!!<3333


Thursday, December 16, 2021

It's Beginning to Look a Lot Like Christmas...

Christmas Tree Skirt Project 

This project came about after my grandma asked me to make a Christmas tree skirt for my great grandma. This, I was happy to do, but soon realized on account of my never having done this before that I didn't know where to start. Luckily, a Christmas tree skirt is basically just a flat fabric donut. 

To Begin

To begin, I made a small pattern out of a sqaure piece of paper that I folded into an even smaller square and cut into a quarter circle. This was to help me visualize how I needed to fold and cut my fabric for max symmetry. After this, (with the paper still folded) I cut another, smaller circle from inside the previous small circle (Lots of small circles!!). This was to be the donut hole, if you will, so the trunk/stem??? of the Christmas tree could fit inside. I will put a picture below to illustrate. This inner circle I cut to scale at a four-inch diameter so I could use it as a pattern directly on the fabric. 

                                             Pretend that says 2-inch radius:)
                                                               
Since I made the unfortunate mistake of waiting to write this post until after I finished the skirt, I didn't take pictures during the process. I did, however, made a paper model of what I did, which I will put below. 

Construction

I cut the fabric like I cut the paper model, folding it lengthwise and then horizontally. I then took my measuring tape and measured my desired width (25 inches for this skirt- this includes seam allowance) away from the corner on the fold, marking this length until I came to the edge of the fabric. I cut this out, but left it folded. 


Next, I took the 2-inch radius paper pattern and matched the corners of the pattern and the fabric, cutting it out. After both of these steps you should have something that can be unfolded to look like a donut. 


Repeat the first step with a lining fabric but cut the lining's inner circle with a 3-inch diameter rather than 4 inches. This will ensure that, when placed on top of each other, the lining will show through with a 1/2-inch border around the fashion fabric's inner circle. 

Sew the two sides right-sides together and turn them inside out so the right sides are showing. 


This is what it should look like. Excuse my messy floor!!!

Once you have done this, clip the lining border so it can comfortably turn in and be topstitched to the outside. This will look strange, considering there will still be readily apparent raw edges, but we will fix this. Trim any excess lining fabric. 

Cut a straight line directly through from the outside edge of the fabric to the inner circle. This will allow the skirt to be put around the tree. 

Now, this is the point where you can customize with a lace, ribbon, etc. Basically, anything that will help hide those raw edges. I chose a red lace to match the candy canes on the fabric. Just make sure that any trim you chose can be sewn around a circular edge. You could also apply a bias tape if trim is not your cup of tea. Trim the outer edge with a topstitch as well and fold all raw edges and extra trimming ends in to finish the edge of the path we cut to the center. Pin, but do not sew. 

To finish the skirt, cut four, 6-inch pieces of ribbon or cord. These are going to serve as the ties to hold the sides of the skirt together after it has been placed around the tree. 

Insert the ribbons where the trim and raw edges have been turned in and pinned. Put one on either side at the top, and the others at the bottom of the path with the trim on the outer edge. Sew both sides and you are finished!! You can see the finished result below. Hopefully that will help illustrate the previous steps. Again, excuse the disaster that is my floor XD. 


                                                  Skirt on the tree 


I hope the instructions made sense. I am still new to this blog-tutorial business. Comment and let me know if you try this method. Happy holidays!!!! <33

My First Attempt: Draping

  Draping a Civil War Sack Coat  My first attempt at draping came early this year, when my brother was cast in a play at school and needed a...