This project came about after my grandma asked me to make a Christmas tree skirt for my great grandma. This, I was happy to do, but soon realized on account of my never having done this before that I didn't know where to start. Luckily, a Christmas tree skirt is basically just a flat fabric donut.
To Begin
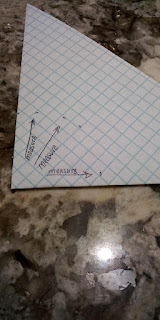
To begin, I made a small pattern out of a sqaure piece of paper that I folded into an even smaller square and cut into a quarter circle. This was to help me visualize how I needed to fold and cut my fabric for max symmetry. After this, (with the paper still folded) I cut another, smaller circle from inside the previous small circle (Lots of small circles!!). This was to be the donut hole, if you will, so the trunk/stem??? of the Christmas tree could fit inside. I will put a picture below to illustrate. This inner circle I cut to scale at a four-inch diameter so I could use it as a pattern directly on the fabric.

Since I made the unfortunate mistake of waiting to write this post until after I finished the skirt, I didn't take pictures during the process. I did, however, made a paper model of what I did, which I will put below.
Construction
I cut the fabric like I cut the paper model, folding it lengthwise and then horizontally. I then took my measuring tape and measured my desired width (25 inches for this skirt- this includes seam allowance) away from the corner on the fold, marking this length until I came to the edge of the fabric. I cut this out, but left it folded.
Next, I took the 2-inch radius paper pattern and matched the corners of the pattern and the fabric, cutting it out. After both of these steps you should have something that can be unfolded to look like a donut.

Repeat the first step with a lining fabric but cut the lining's inner circle with a 3-inch diameter rather than 4 inches. This will ensure that, when placed on top of each other, the lining will show through with a 1/2-inch border around the fashion fabric's inner circle.
Sew the two sides right-sides together and turn them inside out so the right sides are showing.

This is what it should look like. Excuse my messy floor!!!
Once you have done this, clip the lining border so it can comfortably turn in and be topstitched to the outside. This will look strange, considering there will still be readily apparent raw edges, but we will fix this. Trim any excess lining fabric.
Cut a straight line directly through from the outside edge of the fabric to the inner circle. This will allow the skirt to be put around the tree.
Now, this is the point where you can customize with a lace, ribbon, etc. Basically, anything that will help hide those raw edges. I chose a red lace to match the candy canes on the fabric. Just make sure that any trim you chose can be sewn around a circular edge. You could also apply a bias tape if trim is not your cup of tea. Trim the outer edge with a topstitch as well and fold all raw edges and extra trimming ends in to finish the edge of the path we cut to the center. Pin, but do not sew.
To finish the skirt, cut four, 6-inch pieces of ribbon or cord. These are going to serve as the ties to hold the sides of the skirt together after it has been placed around the tree.
Insert the ribbons where the trim and raw edges have been turned in and pinned. Put one on either side at the top, and the others at the bottom of the path with the trim on the outer edge. Sew both sides and you are finished!! You can see the finished result below. Hopefully that will help illustrate the previous steps. Again, excuse the disaster that is my floor XD.


Skirt on the tree

I hope the instructions made sense. I am still new to this blog-tutorial business. Comment and let me know if you try this method. Happy holidays!!!! <33


No comments:
Post a Comment