An Easy Project
Aprons are a great sewing project to make around the holidays. Not only can they be made in festive fabrics and pairs to match with family and friends, but they are also extremely easy and don't take much time to sew.
Around the beginning of December, I started sewing aprons I made from this pattern to sell for a hospital fundraiser. Compared to other crafts I have had to mass produce, they proved both comparatively affordable and straightforward. I have attached a free printable pattern at the end of the tutorial so you can make them too. There is an adult size and a child size.
Cutting the Fabric
For this pattern you will need one fashion/decorative fabric and one lining fabric, preferably both cottons. As mentioned on the pattern, you will need to cut the main pattern pieces on the fold. This will help keep everything symmetrical and prevent you from having to sew multiple seams.
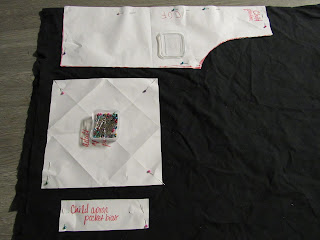
To make my pattern pieces, I just taped computer paper together and cut out my desired shape. Computer paper is useful for pattern making, as it is stiff and not as prone to wrinkling and warping as, say, a tissue paper, and is more commonplace than drafting paper. Here I have pinned the main pattern piece to my fabric, as well as the adult pocket binding and the children's pocket. I am making both a children's and adult size.
For the main pattern pieces, you are going to want to add seam allowance of approximately 1/2 inch.
Do not add seam allowance to the pocket and pocket binding pieces.
Once you have cut out all the pattern pieces, match the main pattern pieces right-sides to right-sides and sew the bottom edge. It should look like this:
Next, put what you just sewed aside and sew the right side of the pocket binding to the right side of the pocket piece.
Once this is done, flip the binding to the wrong side of the pocket piece like you would a bias tape and sew. This will create a decorative edge to hide the raw top of the pocket. This is how it will look:

Next, find the center fold line of both your pocket piece and main decorative piece, aligning them so when the pocket is secured, it will also be centered on the apron. Place the pocket where you would like it to go (preferably toward the center of the apron) and pin. Fold about a half inch up into the pocket on the bottom edge and pin as well. Now, this is where you could either sew to secure the bottom edge of the pocket to the apron or, if you don't like the look of stitching here, flip the pocket down towards the bottom of the apron so it can be easily sewn from the inside. Here is a picture to illustrate:

This way, when you flip the pocket back up after being sewn, it will be secured right smack back in the center, but without a line of stitching on the bottom. This is the method I chose, though in hindsight I realize it might have been easier and more aesthetically pleasing to do it the other way. Anyway, the next step is to flip in the side edges of the pocket and sew so that the pocket is secure on all three edges.

Finished pocket
Another thing that I did for the sake of clear illustrations was use a contrasting thread. I would not recommend this if you aren't fond of seeing the stitching itself, however, I quite like the way mine turned out. I think it accents the white in my fabric nicely.
After you have sewn the pocket onto the apron, match the main pieces right-sides to right-sides again and sew up both side edges. You may wonder how in the heck we are going to attach the ties if we are sewing through the exact place they will be inserted. To that I say, trust the process.
Turn the apron inside out or, rather, outsides out and go cut out your ties if you haven't already. To make the ties you are going to need one sewing machine, one chopstick, and a partridge in a pear tree.
fold the tie piece in half and sew it closed close to the edge. Next, take your chopstick and turn it inside out so you can't see the stitching. You can find a good explanation of how to do this
here. There are special tools you can buy specifically to do this, but I find a chopstick works just as well if you donate all your brain cells to the task of not losing your mind.
Here is a photo of me doing that that provides no help whatsoever.
Once you have turned all four fabric tubes right sides out, seam rip a small hole in each apron side seam that is level with the top of the pocket. Insert about a half inch of the tube into this space and pin. Topstitch both side seams from top to bottom to secure the waist ties. Complete the same process for the neck ties, except fold the top raw edges in before you insert the ties. Make sure you place them about 1 and 1/2 to 2 inches away from each side edge of the apron. This will allow it to fit better, as the neck ties will be closer to the neck.
Finish the apron ties by turning in the raw edges at the end of each tie, topstitching them closed and ironing (optional) so they lay flat. After that, you should be done! Make sure all your strings have been clipped so you don't end up like me in the fifth grade. A very nice girl had to pluck them off my back for me. Enjoy your new apron by baking something festive!
Gladys stylin'
Free Patterns- Not Drawn to Scale
Child and adult patterns in my beautiful handwriting
A close up of the child pattern
A close up of the adult pattern
For the adult ties: cut out 4 rectangles 2 inches wide and twenty-two inches long.
For the child ties: cut out 4 rectangles 2 inches wide and eighteen inches long.
Make sure to comment below if you try this tutorial!!!


Really wonderful blog, with beautiful sewing projects! Love it!
ReplyDelete