Monday, August 8, 2022

My First Attempt: Draping

 Draping a Civil War Sack Coat 

My first attempt at draping came early this year, when my brother was cast in a play at school and needed a costume. That play was Little Women. 

The drama teacher had decided that students were responsible for finding their own costumes. As you can imagine, the majority of those students went straight to Etsy, eBay, or wherever else you find cheap Civil War-esque clothing. That was what we probably should have done. It is not what we did.

Instead, I tasked myself with creating a historically accurate Civil War costume unique to the demographic of the Little Women characters. Note to self: never spend over $100 on your brother's costume in the name of historical accuracy. 

I started by scouring the internet for an accurate pattern. To my utmost surprise, I did not find one in my brother's size. I thought briefly about sizing an adult pattern down but discarded the idea when a little (evil) voice in my head said I should just scratch the idea and make it from scratch. I listened.

Next, came research. If one wishes to construct a historically accurate boy's ensemble from the general time period Little Women is set in, one must pay attention to contextual clues to decide when this is. For me, it was the fact that Joe constantly complains about being a girl, because she is not allowed a place in the army. This, and the dramatic wounding of Mr. March on the front lines of the fight for the Union that ends in a fashionable bob and tears over Joe's "one beauty". It was clear that if Little Women took place at some point during the Civil War, the clothing period I was looking at was around 1860. 

From there, I took the most reasonable course of action and visited Pinterest, as any sane person does in a time of need. A quick search for "Civil War boy's clothing" brought up pictures like this: 


Colombus Depot Jacket at Texas Civil War Museum, picture taken by Phil Graf 
And: 
Civil War Cadet and Three Brothers, photograph taken by Alexander Hesler 

The primary piece in the Civil War boy's ensemble seemed to be a jacket, boxy and untailored, sometimes buttoned up to the neck, and sometimes open to reveal a simple white cotton shirt. Some research revealed this jacket is called a "sack coat", commonly issued by the military to its troops on account of its being easy to make and mass produce. It seemed easy enough to make. That is where, however, like some overconfident remodeler on HGTV, I encountered a problem that was definitely unforeseen. If I was going to attempt the sack coat without a pattern, how was I going to identify and reproduce the seam lines unique to the 1860s? 

Now, would this have been a problem if perfectionism is not also a problem of mine? No. Was I determined to solve it, nonetheless? Yes. Some additional research turned up the Most Helpful PDF ever, that I recommend giving a read even if you aren't attempting a historically accurate Little Women costume for your little brother who doesn't even have a main part in the play and so won't actually be seen that much but you're crazy so you're doing it anyway. 

In the PDF, the author, Paul McKee, provides extremely helpful information on not only what the sack coat and its purpose were, but also diagrams that showcase the seamlines unique to this garment. Here is one such diagram: 


Diagram provided by Paul McKee in his PDF entitled Notes on the Federal Issue Sack Coat 

As you can see, the shoulder seams are set much farther into the back of the jacket than they would be in a modern garment. That is what would have been hard to reproduce had I not had this diagram for reference. 

Armed with this new reference, I collected some scrap fabric and began my first attempt at draping. The first thing I did was pin this fabric to my brother, who insisted on arranging the pins in my pincushion into smiley-faces when I wasn't looking. Disclaimer: no brothers were harmed in the making of this jacket. 

Secondly, I traced the pieces I would need for the project against his measurements, making sure to allow for wiggle room, as the jacket is not tailored. Taking the pieces off my brother, I then added seam allowance and converted them to a paper pattern. After polishing some lines and various details, I cut the pattern out of more scrap fabric and sewed it together, making my first mock-up. A note: the first two to three mock-ups did not include the collar, which I made later. Adjusting and fitting as I went, I modified the pattern pieces until they fit well and resembled the diagram. 

One of the mock-ups I made minus collar and buttons 


For the last mock-up, I designed the collar by cutting a long strip of fabric, which I folded in half. Rounding the top left and right corners, I tried my best to recreate the collars seen in both extant garments and photographs. Here is a close-up of one of these collars: 


Jacket held in collection by the Tennessee State Museum, confederate jacket worn by Private Edward Oldham from Lauderdale County 

Once I was satisfied by the resulting jacket, I cut the revised pattern pieces out of some brown wool flannel I purchased on Etsy. I chose the color brown because it seemed best for a civilian costume, considering it was neither a Union nor confederate color. I sewed them together, attached a white cotton lining, and added metal buttons I purchased at Hobby Lobby. 

The finished product looked like this: 

I also made a pair of cotton pants from an 1860s boy's trousers pattern to pair with the jacket 


The one thing I wish I'd done differently is lengthen the collar on both ends. While extant garments do feature a substantial gap between the end of the collar and the button placket, I feel mine could have been smaller. Other than that, I think it turned out fairly well for my first attempt at draping!! I can safely say my brother wore the most historically (albeit needlessly) accurate costume on stage! 


Sunday, August 7, 2022

The Regency Pelisse- A Brief Explanation

 The Regency Pelisse: An Unlikely Cure 

"The Muslin disease"- a strain of French influenza that ravaged fashion-conscious ladies in the winter of 1803. 

The first casualties of the Napoleonic Wars were not the only deaths attributed to the French in the early Regency. Where thick layers of cotton and fine wool once adorned the legs of upper-class women, now rested gauze and muslins thin enough to see through. Fashions evolved from the comparatively modest styles of Georgian England into those of the new century- the Regency Era. Ladies who embraced these new styles were known as the "Merveilleuses", or "Marvelous Women", for their daring advance into the resurgence of the Grecian Silhouette, the columnar figure, and homage to the Chemise a la Reine. They left their necks and ankles uncovered, throwing off the weighty, past century in a literal sense. This was, until winter came. Until it became impossible to ignore those same necks and ankles, now frostbitten, causing death where medicine of the time could not heal. The aristocracy was losing its most notable members to what was essentially death by fashion. Thus, the entrance of an unlikely cure- the Regency pelisse. 

      Painting by Louis-Leopold Boilly depicting a woman making the sign of the cross to ward off a man who believes her to be a prostitute because of her uncovered legs

The Evolution of a Coat 

The pelisse, as it was known in the Regency era, was a long coat made to resemble the figure of the dresses fashionable at the time. Long, and molded to the dress underneath, the pelisse was both fashionable and practical. Ladies could venture into cold winds without fear of frostbite or the sidelong glance of a fashion critic. As was characteristic of the earlier years of the Regency era, they began simply with little-to-no decoration, reaching hip or knee-length with an open front, and became progressively more elaborate as they changed to suit the styles of the later end of the era, lengthening to the ankles with inventive trim and front-closures. The shorter style of pelisse is referenced in periodicals of the time as a “cassock coat” or “demi pelisse”. This is an interesting detail, considering the pre-existence of the term "cassock coat" as a men's garment. 

Although they grew increasingly popular during the Regency, the origins of the pelisse may be traced back to the 15th century, following the assembly of the Hungarian Hussar regiment, a "Light calvary unit" (Britannica, 2021). This early pelisse, or, dolman, was a "fitted jacket decorated with braids." This jacket is most notably associated with the trimmings on the Regency pelisse, which were inspired by those braids, called frogging.

The pelisses of the later end of the Regency Era are by far the most interesting in terms of fabric choices and embellishments. Early pelisses tended to be simple, as previously mentioned, made of cotton or muslins in contrasting colors to the fashionable pastels of the dresses, with modest amounts of lace or fur edging. Those of the last five years of the Regency, however, incorporated embellishments such as rouleaux trim, swansdown, frogging, padding at the hem, and innovative sleeve caps, among others. Ackermann’s Repository of the Arts, a British periodical published from 1809 to 1829, offers insights into the popularity of these fashions, saying “Pelisses are with us at present the order of the day; one sees scarcely anything else in our promenades,” and “The extraordinary variety both in the form and color of head-dresses, prevents the tiresome uniformity which would otherwise result from the general adoption of this fashion” (Ackermann, 1818). Skirts, by the end of the Regency, were gored to support an A-line shape and padded at the hem with scraps of fabric in order to keep it. 

Rouleaux trim is a favorite of mine. Creating intricate designs, oftentimes floral, thin fabric tubes were stitched in symmetrical patterns across the bodice or “corsage” of the coat, the bottom of its sleeves, and down the front adjacent to its closures. According to Ackermann’s, rouleaux was commonly made of either the pelisse fabric or a crape for lessened bulk. 

Frogging, a military inspired trim, could be composed of rouleaux arranged in a military-reminiscent pattern, cording, or braid. Sleeve caps, called epaulettes, were no less ornate, also having roots in military clothing. 

Series two, volume 5 of Ackermann’s Repository lists fashionable fabrics for pelisse construction at the time of its publication in 1818. “The materials of which they [pelisses] are composed are fine merino cloth, levantine, and sometimes velvet: the latter, however, is but partially worn. Rose-color, azure, and drab are the favorite colors.” Merino cloth is made of wool, and levantine is a silk that originated in France. Linings, it notes, are often of “sarsnet,” which is an old spelling of the modern sarsenet, a fine silk. The most interesting pelisse fabric I have been able to find mention of is “the wool of seal skin.” “The most elegant novelty for the carriage costume, and which is also very appropriate to the dress promenade, is a pelisse composed, we believe, of the wool of seal skin and lined with white sarsnet.” (Ackermann, 1817).

A Death in Court 

On November 7th, 1817, Princess Charlotte of Wales died. She was the daughter of King George the Fourth, Prince Regent, and the court declared a nation-wide mourning period, ordering “The ladies to wear…plain muslins or long lawn crape hoods.” Pelisses fashionable around this time were made from black cloth, as befitted a Regency mourner. As was dictated by tradition, embellishments were not permitted until a later stage of mourning. This was especially disliked by the manufacturers of these embellishments. Kate Williams expounds on this in her book, Becoming Queen Victoria: “Grief was so severe, indeed, that manufacturers of silk, ribbons, and other fancy items of dress petitioned the government to reduce the period of mourning.” Ackermann’s recounts: “The mourning garb of our fair votaries of fashion has experienced little alteration since the publication of our last number. In the promenade costume, pelisses composed of black cloth, lined with black sarsnet, and trimmed with black crape, are most in favor. There is nothing novel or striking either in the form or trimming of these pelisses” (Ackermann, 1818).

The Pelisse as Mentioned in the Novels of Jane Austen 

Only two of Jane Austen’s novels mention the pelisse (at least that I could find). Those novels are Persuasion and Northanger Abbey. Though published together in 1817 after her death, these novels were first completed at very different times in the Regency. Northanger Abbey was written in 1803, and Persuasion was finished sometime between 1815 and 1816. Northanger Abbey references what would have been an early pelisse, describing the loss of words Mrs. Allen encountered after meeting an old friend in the street: “Mrs. Allen had no similar information to give, no similar triumphs to press on the unwilling and unbelieving ear of her friend, and was forced to sit and appear to listen to all these material effusions, consoling herself, however, with the discovery, which her keen eye soon made, that the lace on Mrs. Thorpe’s pelisse was not half so handsome as that on her own” 

Persuasion, similarly, mentions the garment in passing: “If I thought it would not tempt her to go out in sharp winds, and grow coarse, I would have sent her a new hat and pelisse.” (Sir Walter speaks of the ailing Mary Musgrove). This quote calls attention to the popularity of the pelisse as a protective garment in cold weather. Another quote from Persuasion reinforces this idea: “’I had no more discoveries to make than you would have as to the fashion and strength of any old pelisse, which you had seen lent about among half your acquaintance ever since you could remember, and which at last, on some very wet day, is lent to yourself’” (Captain Wentworth speaks of a ship he was given).

The Pelisse as Worn by Austen Herself 

In 2015, Hilary Davidson, expert on Regency fashion and author of several publications including Dress in the Age of Jane Austen, published a twenty-six-page paper detailing her experience reconstructing a pelisse supposed to be that of Jane Austen herself. An extremely detailed and thorough exploration of the garment, I would highly recommend reading it in full. Belonging to a museum in Hampshire, the pelisse, made of brown silk, is the only garment traceable to Austen. Davidson first generalizes her own research on the pelisse by saying: “A pelisse as Austen would have understood it was a style of coat-dress or over-garment, made in every kind and weight of fabric, from sheer cottoned muslins to fur-lined luxury, worn indoors and out, in all seasons, and reaching anywhere from the wearer’s knees to her ankles.” Other definitions, she insists, do not do justice to its many variations. Referring to construction, she notes: “they could be cut with a separate skirt piece, like gowns, or flow uninterrupted from shoulder to hem. Some pelisses had cutaway fronts revealing the skirt below.”

Davidson cites letters written by relations of Austen to prove its origins, taking care to also analyze the financial circumstances of the author at the time such expensive silk would have been purchased. She notes: “Austen would have made some money from her writing at this point; the pelisse could have been a sartorial indulgence. At any rate, it is dated to the period when for the first time she has some independent means.” The fabric of the pelisse is described as a: “warm brown silk twill woven with a pale gold or straw-colored oak leaf motif in opposing diagonals containing four leaves per 4-inch repeat.” The oak leaf motif, she says, was popular at the time, made to symbolize the strength of the British Navy during the Napoleonic Wars, appearing in the funeral garb at those of Britain’s most celebrated military commanders. Austen’s own brothers would have been in the Navy at the time the garment was constructed (Davidson, 2015). Indeed, military inspiration wove its way into everything from fashions to fabric.

The pelisse has a wrap-front, requiring a belt to hold it closed. It has no waist seam, again utilizing the belt to emphasize the figure of the dress that would have appeared underneath. Though the original garment did not, by the time of its acquisition, possess a belt, the reproduction incorporates this detail as the most sensible closure given evidence of this practice in both fashion plates and extant garments. It is striking to note that, as an item presumed to have been worn by Austen herself, it more accurately paints an idea of her appearance than any painting we may speculate over. Again, I would encourage reading the paper itself in full (A link will be provided in the bibliography). 

End Notes 

If there have been any mistakes made either in the factual or citations portions of this post, please do not hesitate to comment below and let me know. I do not wish to spread misinformation or withhold credit where it is due. Happy researching!!!! 

Bibliography 

1. A Beginner's Guide to Regency Fashion- Enchanted Rose Costumes 

2. Reconstructing Jane Austen's Silk Pelisse 1812-1814- Hilary Davidson

3. Hussar | Soldier- Encyclopedia Britannica

4. Pelisse - Fashion, Costume, and Culture: Clothing, Headwear, Body Decorations, and Footwear through the Ages- Encyclopedia of Fashion 

5. Spencers, Shawls, Pelisses and More- Kathy Hummel, Jane Austen Centre 

6. How to find Ackermann's Repository of Arts online- Rachel Knowles 

7. Pelisse | Fashion History Timeline- Kenna Libes 

8. Fashion History: Early 19th Century Regency and Romantic Styles for Women- Dolores Monet

9. Candlestick- Art of Mourning- Barbara Robbins 

10. Frogging- Joseph Pollard 

11. Merveilleuses- Jane Austen's World- Jane Austen's World 

Thursday, January 27, 2022

Annual Regency Ensemble Project: Short Stays

 Regency Short Stays 

The first addition to my 2022 Regency Ensemble Project is the short stays. These were worn by women to encourage and accentuate the much-desired, columnar figure. There are many wonderful posts done by others on the origin of the short stays, as well as the different variations of them. 

Drafting the Pattern

I know I said I was going to use the Redthreaded short stays pattern, but in the end, I decided on drafting my own from instructions instead. (This was mostly because I was bored over Christmas and couldn't bring myself to wait for the pattern to be shipped). I used the same pattern drafting instructions I used to make my first pair of stays (and first Regency project ever). 

I've found over both times using them that the pattern instructions I used are very helpful for the foundation of the pattern, but, at least in my experience, need to be tweaked quite a bit to make the finished result. Now, when using pattern instructions provided by someone else, constructed with their specific measurements, this is to be expected to some extent. I would just advise having a very clear idea of what you would like your stays to look like and making adjustments from there. Overall, however, I cannot say I would have been able to draft the stays without the instructions and do recommend them if you plan on attempting your own. 

The Tweaks

I changed the original pattern to be a few (2) inches longer than the original pattern suggested, lengthening the gussets to coincide with the new measurements. Additionally, I adjusted the armscye to be a bit wider. I found fairly consistently that my measurements caused my pattern to have a slight difference in shape, creating inconsistencies when it was time to draft the gussets. I worked around this by guesstimating ratios and reapplying them with my own measurements. Looking back, I wish I had done more mock-ups and fittings to make sure the gussets were the right size, as they turned out a tad big on top. I also removed the protruding tabs the original pattern had called for to connect the front part of the strap to the back part of the strap. I did this to avoid binding more curves.

Construction

After some mock-ups, I began the stays by cutting the pattern pieces from two layers of a simple white cotton, and one layer of unbleached cotton drill. I considered using canvas for this layer (for extra strength), but after hearing the story of my grandma attempting to sew a sailboat sail (it did not end well), I decided against it. 

The gussets (cue traumatic memories) should have been easy considering it was my third time. This assumption, however, proved untrue. I sewed twelve gussets in total, completing each layer of fabric individually so I could baste them together later on. If you or someone you know is struggling with gusset failure, or feelings of inadequate gussets, know that yes, that last bit of frayed edge at the bottom center will definitely always be there. My solution to this, as well as any other problems that might arise, was stitching over it. I added reinforcement stitches to the problem areas. I will insert a link here to a good gusset tutorial. 


Note: one thing I struggled a lot with was getting the stitching as close to the edge of the gusset as possible, which resulted in a lot of seam-ripping and needle-holes from where the thread had been. To remedy this, I discovered lightly scrubbing the area with water and leaving it to dry. This removes the majority, if not all, of the perforations. 


After completing all three layers of the stays, I basted them together by hand. This made them easier to bind. I then inserted my plastic boning (true historical accuracy in this case was illegal) and connected the back straps to the back pieces with flat felled seams. 

Once I had done this, it was time to hand stitch the bias binding. I chose to go forego the machine for this particular step because I wanted it to look as clean as possible. My only regret with the binding was not being more careful on the curves and mitered corners, as they turned out a bit bunched. I was originally going to use a ready-made bias binding, however, like almost all good things, it contained polyester. I purchased a yard of white cotton and made my own. (I later discovered that the thread I was using also contained polyester, but we are going to pretend, for the purposes of my continued sanity, that this was not the case) (apparently, I decided to overlook machine stitching). 

After the binding was added, I handstitched the eyelets. Because the back straps are not connected to the front of the stays, there ended up being sixteen. A good eyelet sewing tutorial can be found here. I used two strings of embroidery floss. 

The End Result 

I like the 2022 version of my short stays the best. Lack of a thimble did result in some bloodstains (I'll have to find a tutorial for removing those, as well) but they are small. 


                                     The boning didn't want to lay flat.


Thursday, December 30, 2021

Adult & Child Apron Tutorial + Free Pattern

 An Easy Project 

Aprons are a great sewing project to make around the holidays. Not only can they be made in festive fabrics and pairs to match with family and friends, but they are also extremely easy and don't take much time to sew. 

Around the beginning of December, I started sewing aprons I made from this pattern to sell for a hospital fundraiser. Compared to other crafts I have had to mass produce, they proved both comparatively affordable and straightforward. I have attached a free printable pattern at the end of the tutorial so you can make them too. There is an adult size and a child size. 

Cutting the Fabric 

For this pattern you will need one fashion/decorative fabric and one lining fabric, preferably both cottons. As mentioned on the pattern, you will need to cut the main pattern pieces on the fold. This will help keep everything symmetrical and prevent you from having to sew multiple seams. 


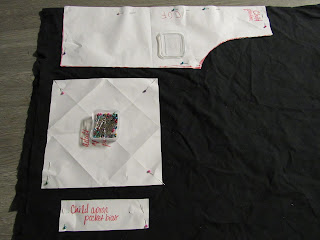
  To make my pattern pieces, I just taped computer paper together and cut out my desired shape. Computer paper is useful for pattern making, as it is stiff and not as prone to wrinkling and warping as, say, a tissue paper, and is more commonplace than drafting paper. Here I have pinned the main pattern piece to my fabric, as well as the adult pocket binding and the children's pocket. I am making both a children's and adult size. 


For the main pattern pieces, you are going to want to add seam allowance of approximately 1/2 inch. Do not add seam allowance to the pocket and pocket binding pieces. 


Once you have cut out all the pattern pieces, match the main pattern pieces right-sides to right-sides and sew the bottom edge. It should look like this:


Next, put what you just sewed aside and sew the right side of the pocket binding to the right side of the pocket piece. 


Once this is done, flip the binding to the wrong side of the pocket piece like you would a bias tape and sew. This will create a decorative edge to hide the raw top of the pocket. This is how it will look:


Next, find the center fold line of both your pocket piece and main decorative piece, aligning them so when the pocket is secured, it will also be centered on the apron. Place the pocket where you would like it to go (preferably toward the center of the apron) and pin. Fold about a half inch up into the pocket on the bottom edge and pin as well. Now, this is where you could either sew to secure the bottom edge of the pocket to the apron or, if you don't like the look of stitching here, flip the pocket down towards the bottom of the apron so it can be easily sewn from the inside. Here is a picture to illustrate:


This way, when you flip the pocket back up after being sewn, it will be secured right smack back in the center, but without a line of stitching on the bottom. This is the method I chose, though in hindsight I realize it might have been easier and more aesthetically pleasing to do it the other way. Anyway, the next step is to flip in the side edges of the pocket and sew so that the pocket is secure on all three edges. 

                                                  Finished pocket  

Another thing that I did for the sake of clear illustrations was use a contrasting thread. I would not recommend this if you aren't fond of seeing the stitching itself, however, I quite like the way mine turned out. I think it accents the white in my fabric nicely. 

After you have sewn the pocket onto the apron, match the main pieces right-sides to right-sides again and sew up both side edges. You may wonder how in the heck we are going to attach the ties if we are sewing through the exact place they will be inserted. To that I say, trust the process. 


Turn the apron inside out or, rather, outsides out and go cut out your ties if you haven't already. To make the ties you are going to need one sewing machine, one chopstick, and a partridge in a pear tree. 

fold the tie piece in half and sew it closed close to the edge. Next, take your chopstick and turn it inside out so you can't see the stitching. You can find a good explanation of how to do this here. There are special tools you can buy specifically to do this, but I find a chopstick works just as well if you donate all your brain cells to the task of not losing your mind. 


Here is a photo of me doing that that provides no help whatsoever. 

Once you have turned all four fabric tubes right sides out, seam rip a small hole in each apron side seam that is level with the top of the pocket. Insert about a half inch of the tube into this space and pin. Topstitch both side seams from top to bottom to secure the waist ties. Complete the same process for the neck ties, except fold the top raw edges in before you insert the ties. Make sure you place them about 1 and 1/2 to 2 inches away from each side edge of the apron. This will allow it to fit better, as the neck ties will be closer to the neck. 

Finish the apron ties by turning in the raw edges at the end of each tie, topstitching them closed and ironing (optional) so they lay flat. After that, you should be done! Make sure all your strings have been clipped so you don't end up like me in the fifth grade. A very nice girl had to pluck them off my back for me. Enjoy your new apron by baking something festive! 

                                                  Gladys stylin'


Free Patterns- Not Drawn to Scale 

                       Child and adult patterns in my beautiful handwriting 

                                      A close up of the child pattern 

                                       A close up of the adult pattern 

For the adult ties: cut out 4 rectangles 2 inches wide and twenty-two inches long. 
For the child ties: cut out 4 rectangles 2 inches wide and eighteen inches long. 

Make sure to comment below if you try this tutorial!!!


Sunday, December 26, 2021

My First Attempt Series #1

 Meet Gladys 

I am starting a new series called "My First Attempt", which is basically going to be a portfolio of sorts; a catalogue of everything I've made pertaining to the Regency era so far. This is the first Regency dress I ever made. I was eleven at the time. It is worn by my lovely model, Gladys. Yes, I named my dress form. 


The main fabric is beautiful tea-dyed cotton I got from Candle on a Hill. You can find it at this link, here. The royal blue silk is from an old kimono my great-grandma got in Japan. I used the Reconstructing History pattern, choosing to opt out of long sleeves for the simple reason that I was unwilling to sweat to death. The first place I wore it was the 2018 Jane Austen festival. 


Here, I am posing for the camera on my mom's phone. The brooch is an heirloom from a great-great-grandma that I pinned to a fichu I made from an old curtain. The fichu and shawl were made from the same material. I will make another post in the future all about the hat, but essentially it is a poke bonnet I made from a deconstructed and heavily embellished straw hat from Michael's and some extra curtain fabric. 


 The neckline of the dress appears wider on Gladys because we are different sizes. I ended up making the dress a few sizes up for two reasons. The first was that the pattern I used didn't offer anything below a size six and my eleven-year-old self was barely out of the kid's section. The second was the sheer amount of layering that I had to account for. On top of the chemise, stays, and petticoat it was worn over, it ended up fitting quite nicely. 


As you can probably tell, or at least surmise, the dress is bib-front/drop-front. The blue Dorset buttons are purely decorative and were found at this seller on Etsy. I held the front of the dress up using small pins and drew the waist in using the silk sash. 

One thing I had never done was cartridge pleats. At first, I wasn't sure how I was going to make the back panel small enough to be sewn onto the bodice. I think the pattern called for box pleats, but it soon became apparent that the enormous amount of fabric I was working with could not be shortened by using a few pleats. I tried gathering, and then I tried more pleats than was recommended. Neither worked, so I did some research and found cartridge pleats. As it happens, these were accurate as they were used on dresses of the Regency era. Cartridge pleats are perfect for condensing a large amount of fabric into a shorter length without producing as much bulk as you might expect. 


The second place I wore it was the Jane Austen Centre in Bath, when I went with my family that same year. 

                                  My grandma made the spencer jacket

Here I am in all my mustachioed glory. We hoped to arrive in time for the annual promenade, but unfortunately, we were a few days late, so I settled for struggling down the street in my newspaper stuffed shoes and posing for pictures with people who mistook me for part of the exhibits. It was a lot of fun, and I got to see letters written by Jane Auten herself!!!! I accumulated a lot of dirt on the hem, but it touched the ground in Bath so what can I do but never wash it ever again XD.

                                    Me gazing lovingly at the camera

                                      Me gazing lovingly at the future

                                    Me gazing lovingly at a feather


All in all, this dress was really fun to make and even more so to wear. As you can imagine, I was very proud when I stitched that last stitch and presented it excitedly to every single person I saw over the next year and a half. 

Comment below if you've ever been to the Bath promenade!!!!<3333


Thursday, December 16, 2021

It's Beginning to Look a Lot Like Christmas...

Christmas Tree Skirt Project 

This project came about after my grandma asked me to make a Christmas tree skirt for my great grandma. This, I was happy to do, but soon realized on account of my never having done this before that I didn't know where to start. Luckily, a Christmas tree skirt is basically just a flat fabric donut. 

To Begin

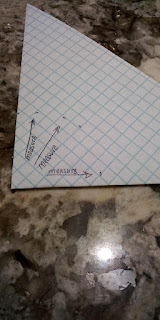
To begin, I made a small pattern out of a sqaure piece of paper that I folded into an even smaller square and cut into a quarter circle. This was to help me visualize how I needed to fold and cut my fabric for max symmetry. After this, (with the paper still folded) I cut another, smaller circle from inside the previous small circle (Lots of small circles!!). This was to be the donut hole, if you will, so the trunk/stem??? of the Christmas tree could fit inside. I will put a picture below to illustrate. This inner circle I cut to scale at a four-inch diameter so I could use it as a pattern directly on the fabric. 

                                             Pretend that says 2-inch radius:)
                                                               
Since I made the unfortunate mistake of waiting to write this post until after I finished the skirt, I didn't take pictures during the process. I did, however, made a paper model of what I did, which I will put below. 

Construction

I cut the fabric like I cut the paper model, folding it lengthwise and then horizontally. I then took my measuring tape and measured my desired width (25 inches for this skirt- this includes seam allowance) away from the corner on the fold, marking this length until I came to the edge of the fabric. I cut this out, but left it folded. 


Next, I took the 2-inch radius paper pattern and matched the corners of the pattern and the fabric, cutting it out. After both of these steps you should have something that can be unfolded to look like a donut. 


Repeat the first step with a lining fabric but cut the lining's inner circle with a 3-inch diameter rather than 4 inches. This will ensure that, when placed on top of each other, the lining will show through with a 1/2-inch border around the fashion fabric's inner circle. 

Sew the two sides right-sides together and turn them inside out so the right sides are showing. 


This is what it should look like. Excuse my messy floor!!!

Once you have done this, clip the lining border so it can comfortably turn in and be topstitched to the outside. This will look strange, considering there will still be readily apparent raw edges, but we will fix this. Trim any excess lining fabric. 

Cut a straight line directly through from the outside edge of the fabric to the inner circle. This will allow the skirt to be put around the tree. 

Now, this is the point where you can customize with a lace, ribbon, etc. Basically, anything that will help hide those raw edges. I chose a red lace to match the candy canes on the fabric. Just make sure that any trim you chose can be sewn around a circular edge. You could also apply a bias tape if trim is not your cup of tea. Trim the outer edge with a topstitch as well and fold all raw edges and extra trimming ends in to finish the edge of the path we cut to the center. Pin, but do not sew. 

To finish the skirt, cut four, 6-inch pieces of ribbon or cord. These are going to serve as the ties to hold the sides of the skirt together after it has been placed around the tree. 

Insert the ribbons where the trim and raw edges have been turned in and pinned. Put one on either side at the top, and the others at the bottom of the path with the trim on the outer edge. Sew both sides and you are finished!! You can see the finished result below. Hopefully that will help illustrate the previous steps. Again, excuse the disaster that is my floor XD. 


                                                  Skirt on the tree 


I hope the instructions made sense. I am still new to this blog-tutorial business. Comment and let me know if you try this method. Happy holidays!!!! <33

My First Attempt: Draping

  Draping a Civil War Sack Coat  My first attempt at draping came early this year, when my brother was cast in a play at school and needed a...